The NetDose dosimeter measures exposure to ionizing radiation that includes photons (Gamma and X-Ray).
Wearing the dosimeter
In order for the dosimeter to measure dose appropriately, it must be worn appropriately. The dosimeter has a front side that should face away from the user, and a back side that should face toward the user. The dosimeter case includes a clip that can be used to attach the dosimeter to the user's apparel.


-
The dosimeter should be worn at all times when there is a potential for occupational exposure to ionizing radiation.
-
Dosimeters not in use should be stored in an area without radiation to prevent exposure that is not work-related.
-
Dosimeters should be worn at the body location indicated on the dosimeter label and should never be cut, covered, blocked, or written on. When a protective garment is worn, the dosimeter should be worn at the collar outside of the protective garment or at the waist behind the protective garment. Your dosimeters may need to be configured for Effective Dose Equivalent (EDE) calculations. Please click here of more information.
-
Be sure to use only the dosimeter marked with the proper individual's identification.
Communicating With the Dosimeter
To connect to a dosimeter using the mobile app, please refer to the quick start guide located here that will walk you through the device synchronization process.
The dosimeter can be linked to multiple Bluetooth Low Energy (BLE) enabled devices, allowing for flexible monitoring of radiation exposure. This provides users with more options and convenience.
The dosimeter must be manually connected or 'synchronized to the mobile app in order to transfer information back and forth between the NetDose software and the dosimeter device. There is not an automatic transfer of data.
Changes made by the user in the NetDose web interface that affects data collection on the dosimeter must be transferred to the dosimeter device to be completed/finalized. If a status in the web interface is 'pending' (pending assignment, pending unassignment, pending configuration, etc.), it means the settings are waiting to be finalized when a connection is made to the dosimeter device.

Dosimeter Memory
The dosimeter will record each day's doses as a single daily dose. The dosimeter can store up to 500 daily doses. After this, the dosimeter will still record data but will begin to overwrite the oldest data on the device. Losing data in this way should not be a concern because the device can store over a year of daily doses.
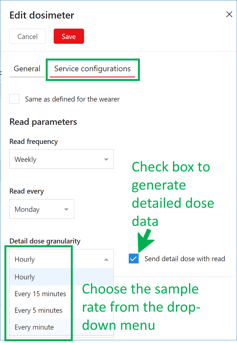
The dosimeter has the option to record a detailed dose record in time increments shorter than a day.
These options can be found under the dosimeter read parameters within the Account Profile, Departments, Users, or Devices menus. Each menu item allows various layers of control.
The dosimeter stores detailed dose information independently of the daily dose and does not affect daily dose storage in anyway. The amount of time that can be covered by the detailed dose sampling is dependent on the sample rate:

When the detailed dose storage is full, it will still record data, but will begin to overwrite the oldest data stored on the device. This means if the detailed dose is set to sample every minute, the dosimeter must be synchronized with the mobile app every three days or detailed dose data will be lost.
Detailed dose information can help users pinpoint when dose events are occurring.
Finding Dosimeters in the Web User Interface (UI)
Details about the dosimeters can be found by logging into the Web UI and clicking on the 'Devices' tab Navigation menu on the left side of the screen.
 This will show all devices that are associated with your account. From here you can edit device properties and assign devices to users.
Devices are listed by serial number. To identify specific dosimeters, compare the Device SN with the Device SN on the back of the dosimeter.

Contact support if all dosimeters from the account are not listed on the 'Devices' page or if you identify any discrepancies in the Device SN.
Dosimeter Status Lights
The blue button on the back of the dosimeter can be pressed once to check the dosimeter's general status.
If the button is held for three seconds, the device will attempt to synchronize with the mobile app.
The status is relayed by displaying a specific pattern and color of lights from the LED opposite of the button.


Additional LED patterns may display:
