Overview
Departments can be a useful organizational tool to define and manage different groups of users within an account. Departments can have individually defined dose thresholds and read frequencies to match the specific type of work required by the users in a department.
Supervisors assigned to a department have the authority to oversee and supervise other users who are also part of their department.
Users with an Administrator role can add new departments, view details of existing ones, and assign departments to Supervisors and Wearers.
NOTE: For more information about user roles and their capabilities, click here.
Creating Departments
Step 1: Navigate to the Departments page.
Access the 'Departments' page by clicking on the 'Departments' navigation menu on the left side of the screen. This page displays a list of all the departments that have been created. As an administrator, you have the ability to navigate through the departments' list, add new departments, or view details of existing ones. You can also perform sorting, filtering, and search operations to easily find the department you are looking for.
Step 2: Click the 'Create department' text.
To create a new department, simply click on the 'Create department' button. This will open an additional panel with three tabs: 'General', 'Service configurations', and 'ALARA thresholds'.

Step 3: Enter the department's information.
A window will open with three tabs. You can navigate between the tabs by clicking on the text description.

- General: You will need to provide the department name. Make sure the name is unique within the account to avoid any confusion. This name will help identify the department and distinguish it from others.
 Service configurations: you can configure various settings related to the department. These settings include read parameters, dose thresholds, dose rate thresholds, and labeling options. By default, these settings are set to be the same as those of the customer account. However, if you wish to customize the department's settings, you can uncheck the 'Same as for the customer account' box and make the necessary changes. For more information regarding read settings, please click here.
For more information regarding thresholds, including ALARA thresholds mentioned below, please click here. ALARA thresholds: Allows you to set ALARA Level I and ALARA Level II thresholds for the department. These thresholds help in monitoring and controlling radiation exposure. By default, these thresholds are inherited from the account level. If you want to set different thresholds for the department, you can uncheck the 'Same as for the customer account' option and input the desired values. It is important to note that the ALARA Level II thresholds should always be higher than the ALARA Level I thresholds.
Step 4: Save the new department.
All fields marked with an asterisk '*' are mandatory. Once you have provided all the mandatory information, the save button will turn red, allowing you to click to save. A notification of success or failure will be displayed at the top of the page.

Deactivating Departments
If for whatever reason a department is no longer needed, it can be deactivated. However, this can only be done if there are no active users associated with that department (click here for more information about user status). To deactivate a department, select the department from the departments table, click the 'Edit' button, choose 'Inactive' from the status drop-down menu on the details panel, and then click 'Save'. Once a department is deactivated, it will be listed as 'Inactive' in the departments table, and all the inactive users will be moved to the account level. Deactivated departments can no longer be edited.

Reactivating Departments
If you wish to reactivate a department, simply select the department from the departments table and click the 'Reactivate' button on the department details panel. Confirm the reactivation, and the department will be listed as 'Active' in the departments table once again.


Assigning Users to Departments
Administrators can add users to departments two ways:
- Setting the department in the user's profile by editing an existing profile or when creating a new user. For more information click here.
- Select a single user or multiple users from the user list:
- Select the users you wish to assign from the users list. For multiple users, check the boxes next to the user's name.
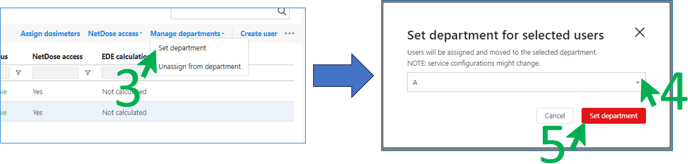
- Click the 'Manage departments' text in the upper right corner.

- Click 'Set department from the drop-down menu.
- A pop-up window will display. Click the field to select an existing department from the drop-down menu.
- Click 'Set department'.
By following these guidelines, you can efficiently manage departments within your organization, ensuring smooth operations and effective allocation of resources.